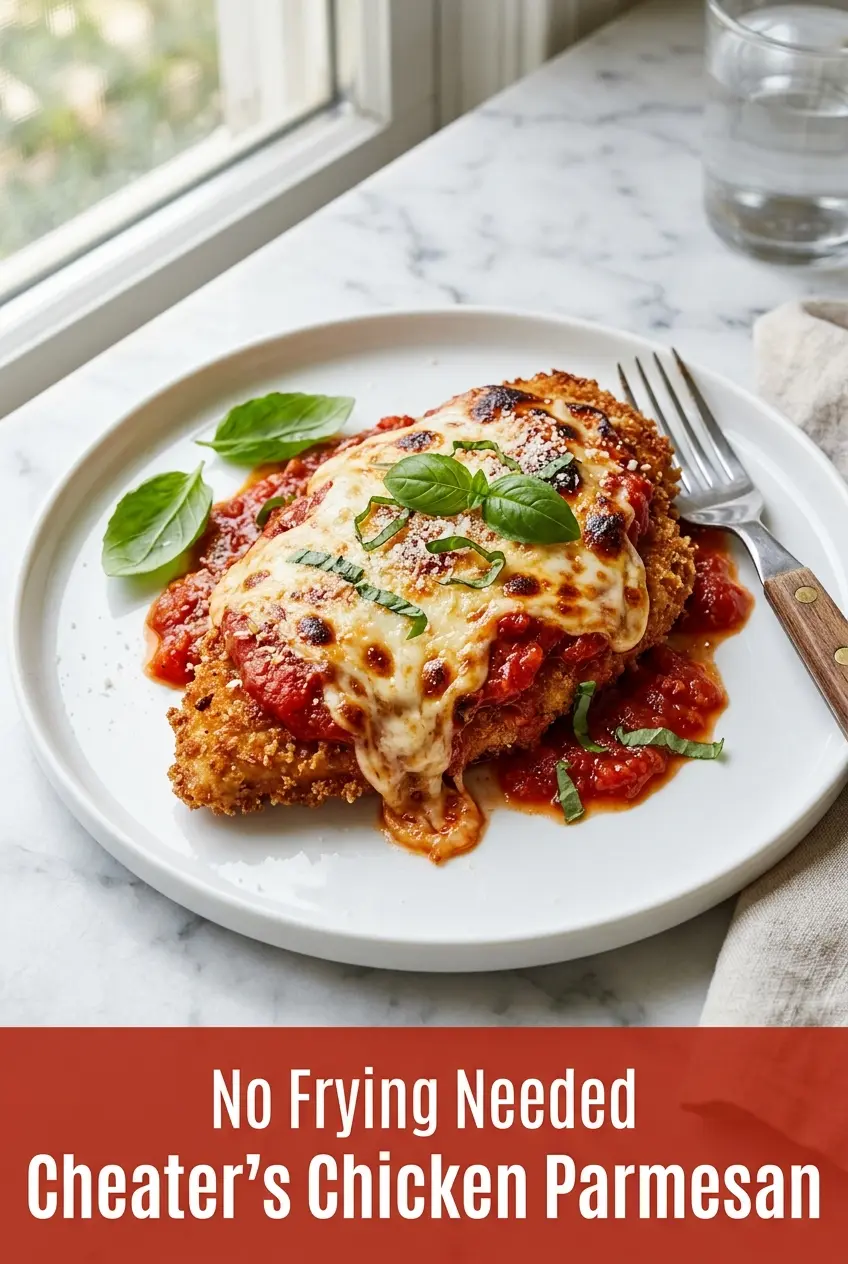
Craggy, golden chicken cutlets under a blanket of marinara and melted mozzarella hit every note people want from Chicken Parmesan without turning the kitchen into a frying station. The breading stays crisp, the cheese melts into the sauce instead of sliding off, and the whole pan comes together fast enough for a weeknight but still tastes like you paid attention. That balance is what makes this version worth keeping around.
The shortcut is smart, not lazy. A quick sear in olive oil sets the crust before the oven finishes the chicken, which keeps the coating from going soggy under the sauce. Using Italian breadcrumbs plus Parmesan gives the breading both texture and a salty, savory edge that plain crumbs can’t pull off on their own. The oven does the heavy lifting after that, so you get juicy chicken and bubbling cheese without babysitting a skillet of hot oil.
Below, I’ll walk through the one step that keeps the breading attached, the ingredient swaps that still give you a solid result, and the reheating method that brings leftovers back without turning them limp.
Bake, Serve, Wear the Vibe 👕
Editor-picked tees our Oven To Fork readers love.


We may earn from qualifying purchases at no extra cost to you.
The coating stayed crisp even after the sauce and cheese went on, and the chicken was still juicy after baking. My husband asked if I could put this in the dinner rotation every other week.
Save this Cheater’s Chicken Parmesan for nights when you want crisp breading, bubbling mozzarella, and a fast path to a dinner that feels classic.
The One Step That Keeps the Coating Crisp Under the Sauce
The breading fails when the chicken goes into the oven raw and wet, or when too much sauce gets dumped on top before the crust has a chance to set. That first sear matters because it hardens the outer layer just enough to survive the marinara and cheese. You don’t need a deep fry for that. You need hot oil, a dry cutlet, and the patience to let each side turn deeply golden before it leaves the pan.
The other trap is overcrowding the baking sheet. If the pieces sit too close together, the steam trapped between them softens the crust before the cheese even melts. Give each cutlet its own space, and use just enough sauce to cover the center without flooding the edges. Those uncovered edges are what stay crisp and give you contrast against the melted mozzarella.
What Each Ingredient Is Doing in This Dish

- Chicken breasts — Halving them into cutlets isn’t just about speed. It gives you thinner pieces that cook through before the coating burns, and it creates more surface area for breading and sauce. If you use larger chicken pieces without thinning them, the outside will overcook before the center is done.
- Italian seasoned breadcrumbs — These bring seasoning and texture in one ingredient, which matters in a shortcut recipe. Plain breadcrumbs work in a pinch, but you’ll need to add extra Italian seasoning and salt. Panko can be used if you want a lighter crunch, though the crust will be less classic and a little less cohesive.
- Parmesan — The grated cheese does more than add flavor. It helps the breadcrumb coating brown and gives the crust a savory finish that stands up to the sauce. Use finely grated Parmesan, not a big snowy pile of shredded cheese, so it clings cleanly to the breading.
- Marinara sauce — A thicker sauce is your friend here. Thin sauce runs off the chicken and softens the crust, while a thicker jarred sauce sits on top and melts into the cheese. If your marinara tastes flat, a pinch of salt or a little extra Parmesan in the sauce fixes more than sugar ever will.
- Mozzarella — Shredded mozzarella melts evenly and gives you those stretchy, bubbling spots people expect from Chicken Parmesan. Fresh mozzarella can work, but it releases more moisture, so blot it first or the tops will get watery.
The Fast Sear and Oven Finish That Build the Best Chicken Parmesan
Set Up the Dredging Line First
Lay out the flour, beaten eggs, and breadcrumb-Parmesan mixture before the chicken hits the counter. That keeps one hand dry and one hand wet, which is the easiest way to avoid clumpy breading fingers and a messy coating. Shake off the excess flour before the egg dip; too much flour turns pasty and can make the crust peel.
Press the Crumbs On, Don’t Just Dip
After the egg, press each cutlet firmly into the breadcrumbs so the coating actually grabs. A light dusting gives you patchy spots that fall off in the skillet. If the breading feels loose, pause for a minute after coating the chicken and let it sit before it hits the oil; that short rest helps the crumbs hydrate and adhere.
Sear Until the Color Turns Deep Gold
Heat the oil until it shimmers, then lay the cutlets in without crowding the pan. You’re looking for a deep golden crust, not pale beige breading that will soften later. Two to three minutes per side is usually enough. If the pan isn’t hot enough, the coating soaks up oil instead of crisping, so wait for the sizzle the second the chicken touches the skillet.
Bake with Sauce and Cheese in the Middle
Move the chicken to the rack or baking sheet once both sides are seared, then spoon the marinara over the center and top with mozzarella. Keeping the sauce in the middle leaves the edges exposed so they stay crisp. Bake until the chicken reaches 165°F at the thickest point and the cheese is melted with browned spots at the edges. Broil at the end only long enough to color the cheese, because a few extra seconds can take it from bubbly to scorched.
Three Ways to Adapt This Without Losing the Point
Gluten-Free Breading That Still Stays Crisp
Use a gluten-free all-purpose flour blend and gluten-free breadcrumbs or crushed gluten-free crackers. The texture will be slightly lighter, but the same flour-egg-crumb order still gives you a sturdy coating. Just press the crumbs on well and don’t skimp on the sear.
Dairy-Free Version
Swap the Parmesan for a dairy-free Parmesan-style topping and use your favorite dairy-free mozzarella shreds. You’ll lose a little of the savory bite that real Parmesan brings, so season the breadcrumb mixture a touch more aggressively with salt and Italian seasoning. The finished dish still gets you the same saucy, baked comfort.
Make It a Little Lighter
Bake the breaded cutlets on the rack without the skillet sear if you want to cut back on oil. The crust won’t be as deeply browned, but it will still set up and hold the sauce. A light spray of oil over the top before baking helps the crumbs color instead of drying out.
Storage and Reheating
- Refrigerator: Store leftovers in an airtight container for up to 3 days. The crust softens a bit from the sauce, but the flavor stays strong.
- Freezer: It freezes best before adding the sauce and cheese. Freeze the cooked breaded chicken on its own, then add sauce and cheese after thawing and reheat in the oven.
- Reheating: Warm in a 375°F oven until heated through and the cheese is bubbling again. The common mistake is microwaving it, which turns the breading rubbery and makes the coating slide off.
Answers to the Questions Worth Asking
Cheater's Chicken Parmesan
Ingredients
Equipment
Method
- Preheat the oven to 400°F and line a baking sheet with a wire rack, lightly sprayed with cooking spray.
- Season the chicken cutlets on both sides with garlic powder, onion powder, Italian seasoning, salt, and black pepper.
- Place all-purpose flour in one shallow dish, beaten large eggs in a second, and mix Italian seasoned breadcrumbs with grated Parmesan cheese in a third.
- Coat each cutlet in flour and shake off excess.
- Dip each floured cutlet into the beaten eggs.
- Press each cutlet firmly into the breadcrumb mixture so the coating adheres.
- Heat olive oil in a large oven-safe skillet over medium-high heat until hot.
- Sear the breaded cutlets 2–3 minutes per side until golden brown.
- Transfer the seared cutlets to the prepared baking sheet.
- Spoon 2–3 tbsp marinara over each cutlet.
- Pile shredded mozzarella on top of each cutlet so it covers the surface.
- Bake at 400°F for 15–18 minutes until the chicken reaches an internal temperature of 165°F and the cheese is melted and bubbly.
- Broil for 1–2 minutes until the cheese develops extra golden spots.
- Garnish with fresh basil leaves and serve immediately over pasta or with crusty bread.