It’s time to celebrate summer with an ice cream party on your porch! Just grab your favorite ice cream flavors, some fun toppings like sprinkles, fruits, and nuts, and let the good times roll!
Nothing beats a warm day with cold treats! I love setting up a DIY sundae station where everyone gets to build their own delicious creation. It’s messy, but oh so fun! 🍦
Ingredients & Substitutions
Chocolate Ice Cream Sandwich Cookies: Typically, you’ll find a package of about 8 sandwiches. If you’d like to switch things up, you can use cookie sandwiches in different flavors like vanilla or mint chocolate.
Bake, Serve, Wear the Vibe 👕
Editor-picked tees our Oven To Fork readers love.


We may earn from qualifying purchases at no extra cost to you.
Sprinkles: Red, white, and blue sprinkles add a fun festive touch. You can mix in colorful candies or edible glitter for extra flair!
Vanilla Ice Cream: While optional, adding vanilla ice cream can make these sandwiches even more delicious. If you want a non-dairy option, many brands offer coconut or almond milk-based ice creams.
How Can I Make My Ice Cream Sandwiches Stand Out?
A great way to add flair is through the decorating process. Once you’ve softened the ice cream sandwiches, press the edges into the sprinkles firmly but gently to ensure they stick well. You can also roll the sides in mini chocolate chips or crushed nuts for even more variety.
- Organize the sprinkles on a plate for easy access, making the assembly fun and interactive for kids!
- Work quickly if it’s a hot day so the ice cream doesn’t melt too much.
- Don’t forget to serve them cold; you can keep the extra sandwiches in the freezer until ready to serve.
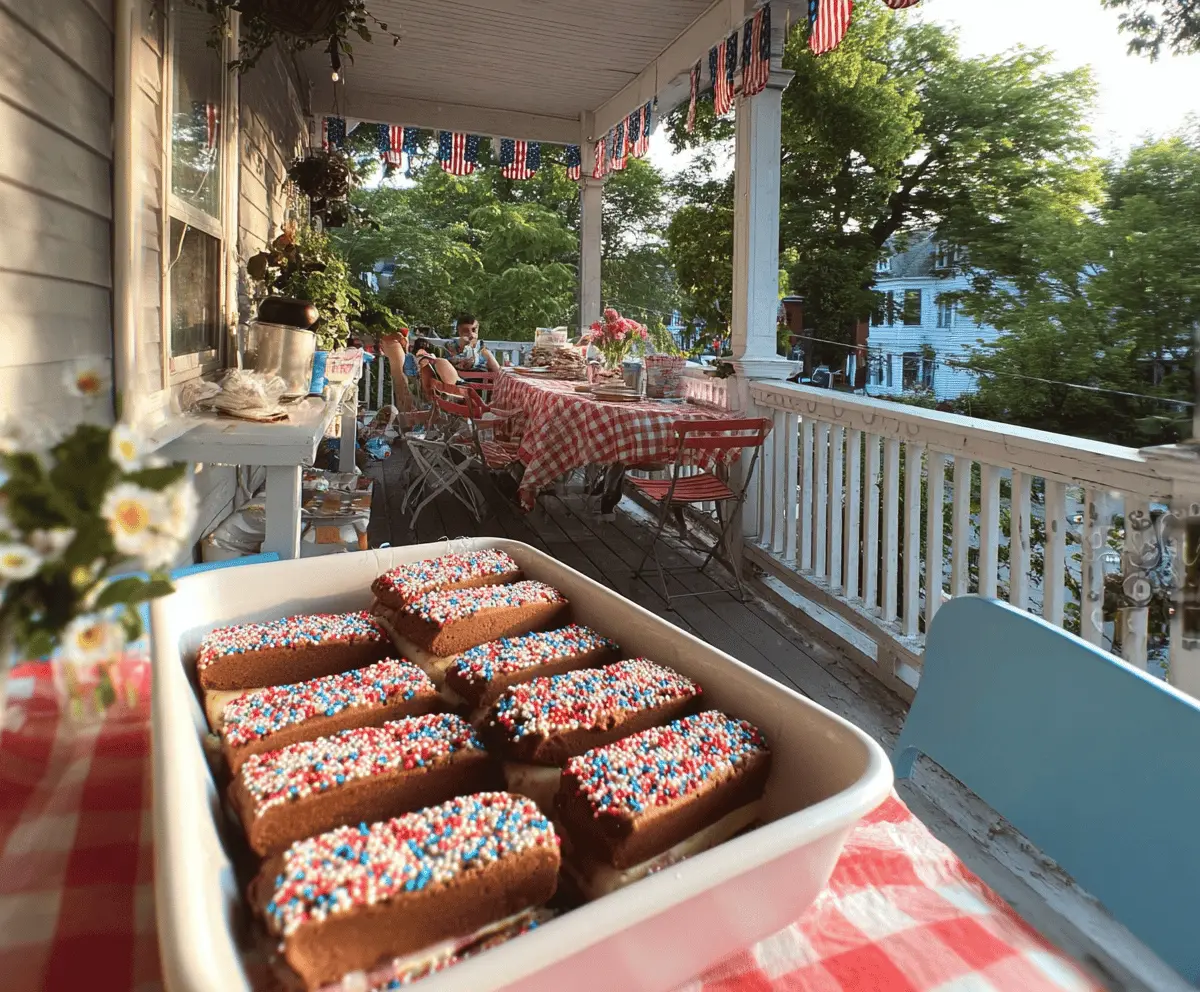
Patriotic Ice Cream Sandwiches with Sprinkles
Ingredients:
- 1 package chocolate ice cream sandwich cookies (about 8 sandwiches)
- Red, white, and blue sprinkles (including jimmies and star-shaped sprinkles)
- 1 pint vanilla ice cream (optional if making from scratch or assembling loose)
Instructions:
1. Soften the Ice Cream Sandwiches:
Start by letting the chocolate ice cream sandwich cookies sit at room temperature for about 5 minutes. This makes them easier to handle and helps the sprinkles stick better.
2. Prepare the Sprinkles:
Take a shallow dish or a plate and spread the red, white, and blue sprinkles evenly across it. This will be your decoration station!
3. Decorate the Sandwiches:
Gently press the edges of each ice cream sandwich into the sprinkles, making sure they stick to the sides nicely. Don’t be shy—get a good coating on those edges!
4. Arrange on a Baking Sheet:
After decorating, place your sprinkles-covered ice cream sandwiches on a baking sheet or tray lined with parchment paper. This will help keep everything tidy!
5. Firm Them Up:
Put the decorated sandwiches in the freezer for at least 1 hour. This will allow them to firm back up, making them easier to eat later on.
6. Serve and Enjoy:
Once they’re ready and chilled, serve your patriotic ice cream sandwiches as festive treats. Perfect for an easy, cheerful ice cream party on the porch!
This delightful recipe blends the classic taste of chocolate ice cream sandwiches with fun, colorful sprinkles, making for simple yet festive summer treats!

FAQ
Can I Use Different Flavors of Ice Cream Sandwiches?
Absolutely! While chocolate is classic, feel free to experiment with other flavors like vanilla, mint, or even cookie dough. Just make sure the flavors complement your chosen sprinkles!
How Long Can I Store the Ice Cream Sandwiches?
You can store the decorated ice cream sandwiches in an airtight container in the freezer for up to a week. Just make sure to keep them separated with parchment paper to prevent sticking!
Can I Make These Sandwiches Ahead of Time?
Yes, these sandwiches can be prepped a day in advance! Simply follow the instructions and store them in the freezer. They’ll be ready to serve when you are!
What Other Toppings Can I Use?
Feel free to get creative! Other fun toppings include mini chocolate chips, crushed nuts, or even bits of dried fruit. Just ensure they adhere well to the ice cream for a fun, decorative touch!